2021 Video Submission
 Record Narration for PowerPoint – This is without picture in the corner.
Step-by-step instructions for how to record your narration and it to your PowerPoint slides
Step 1 Setup Your Microphone
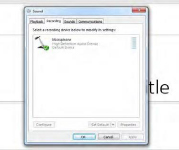
Before you start to record audio inside PowerPoint, start off by making sure that your microphone is plugged in and ready to record. Whether you’re on Windows or macOS, you’ll want to access the audio device settings and set your default microphone.
You can’t change which device to record from or set volume levels for the microphone inside of PowerPoint, so make sure that it’s ready for recording before you dive into PowerPoint.

Step 2 Press Record in PowerPoint
To record narrations in PowerPoint, start off by finding the Slide Show tab on PowerPoint’s ribbon. Click on the Slide Show tab to change the available options.
Make sure that you start on the first slide in PowerPoint to record audio and timings for the entire presentation.
Now, find the Record Slide Show button and click on it. A new window will pop up with two options to set before you start recording:
-
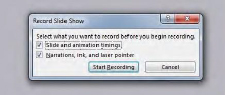
Leave both of these options checked to record audio narrations and synchronize slide change timings. Slide and animation timings.
Leave this option checked if you want to setup the timings for your slides. Basically, this option allows you to sync up your narration with slides. I recommend leaving it on. - Narrations, ink, and laser pointer.
Definitely leave this option checked to record audio narrations, even if you don’t plant to use ink or the pointer to add illustrations.
Make sure you’re ready before you press Start Recording. As soon as you click on it, PowerPoint will begin to record your screen and audio.
Step 3 Start Recording Your Narration

Once you Start Recording, PowerPoint will go into a full screen presentation view. It also begins recording audio from your microphone.
In the upper left corner of the window, you’ll see a Recording window with a runtime counter and other buttons. Use this to keep track of the length of your presentation.
You can use the arrow keys on your keyboard to switch between slides while recording. Use the right arrow to jump to the next slide, or the left arrow to move to the previous PowerPoint slide.
Basically, PowerPoint is recording exactly what’s on your screen along with the audio you speak into your microphone.
When you’re finished, click on the X button in the upper right corner of the Recording window to complete the audio recording.
 Step 4 Use Annotations (Optional)
While you’re recording your presentation, you can also add annotations to your PowerPoint. You can use a digital pen, highlighter or laser pointer to add markings.
This feature is great when wanting to gesture toward something specific on the slide during your narration.
To use annotations, hover in the lower left corner of your presentation while recording the presentation. There are extra tools that you can choose from. For an annotation, click on the third icon of the left to choose from one of the tools.

Step 5 Reset Presentation Timings as Needed
Let’s say that you had the perfect audio take, but the timings of your slide changes were off by a bit. That’s no problem; we can readily restart the process of setting your slide timings.
To do that, make sure that you’re on the Slide Show tab and click on Rehearse Timings. Your presentation will go into full screen mode and you can use the arrow keys to changes slides to set new timings.
Now that you’re finished, you can send your presentation with your narration embedded. When the presentation is played, your recorded narration will play with it, on the timings you’ve setup while rehearsing.